This lesson explains how to configure your Service Pro coverage area(s), by zip code. This lets you see your company’s overall coverage area based on the Service Pro’s dispatch zip code and service radius listed in their profile, and gives you the ability to adjust those settings. In order for your Service Pro(s) to display in your coverage map, their ServiceLive Membership status must be Approved – Active.
To view your current zip code coverage:
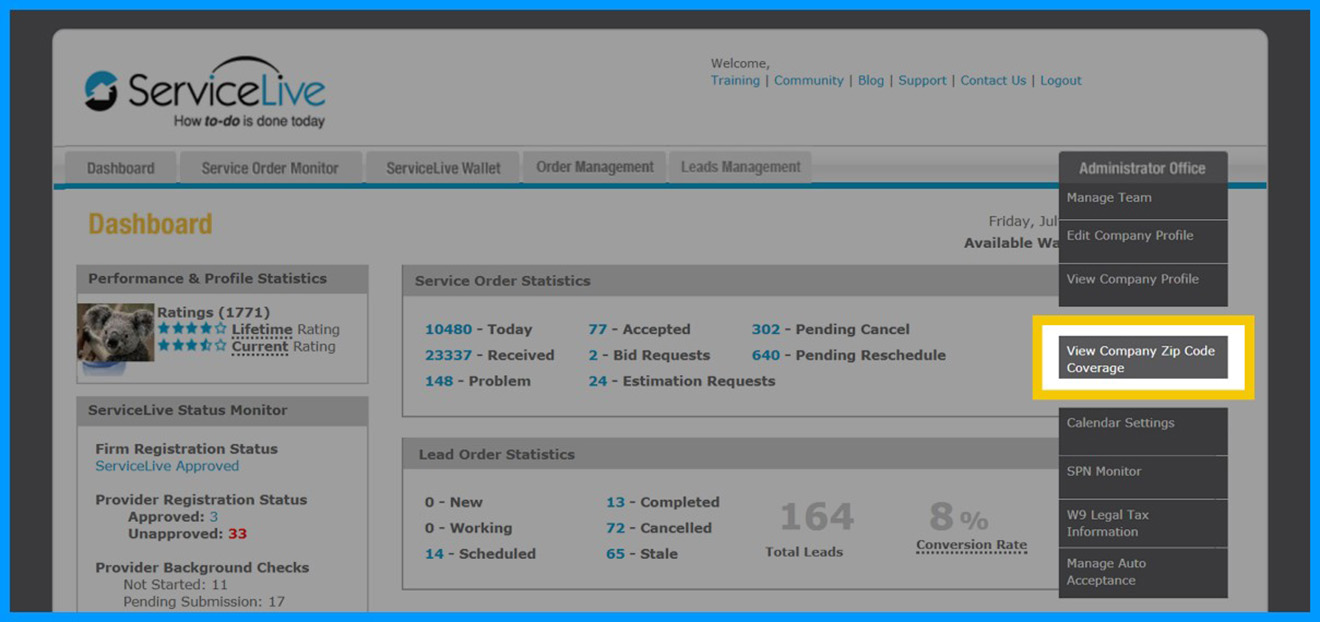
• Hover over the Administrator Office tab.
• Click View Company’s Zip Code Coverage.
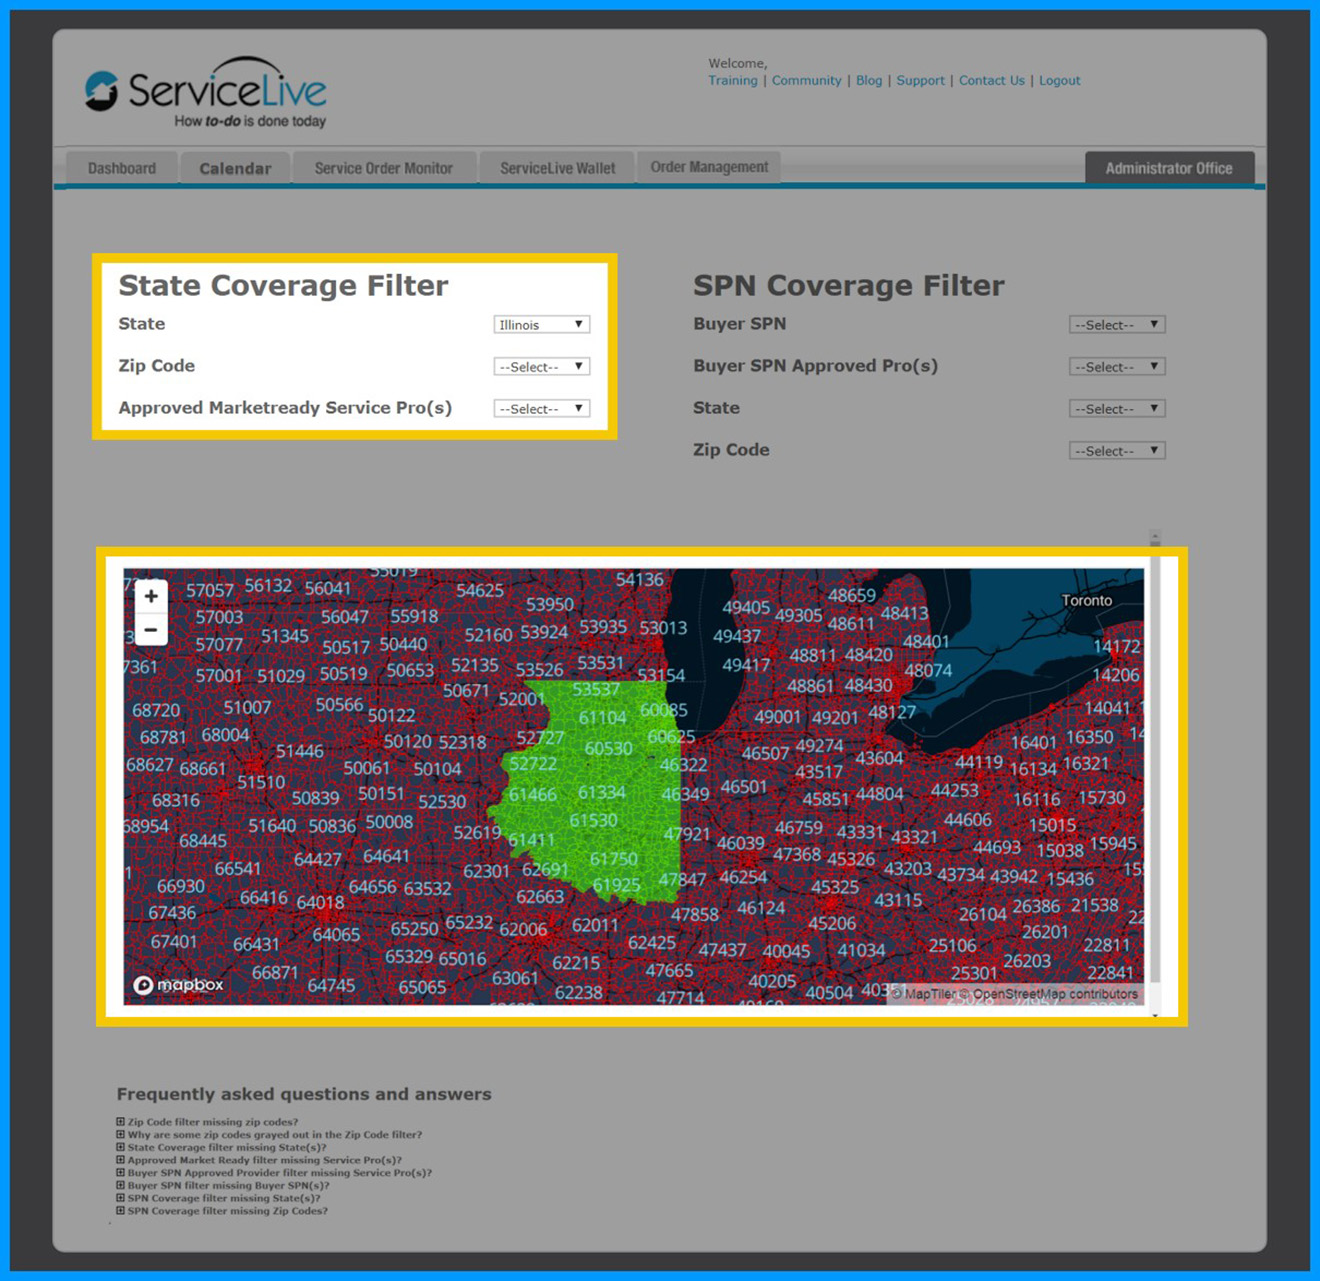
• The coverage page will display, and includes State and SPN filter categories, along with an FAQ section to help guide you through these filters. If you don’t see the coverage results you’re looking for, this FAQ section will explain how these filters work, along with solutions on how to adjust your coverage settings.
• The State Coverage filters allow you to see your company’s Service Pro coverage in a specific State.
• The SPN Coverage filters allow you to see your company’s Service Pro coverage for a specific Buyer’s Select Provider Network (SPN).

• Only one coverage category (State or SPN) can be applied at a time. When a category filter is selected, a map will display the results.
• The State filter category shows you which State(s) your Approved Market Ready Service Pros are located in. When you select a state – the Zip Code and Approved Market Ready Service Pro(s) filters will automatically refresh with additional options to allow you to see the zip codes your Pro(s) cover, and which Pro(s) cover them.
• The Buyer SPN filter category shows you the SPN(s) your Service Pros are members in. When you select an SPN – the Buyer SPN Approved Pro(s), State, and Zip Code filters will automatically refresh with additional options to allow you to see the zip codes your Pro(s) cover for that Buyer’s work, and which Pro(s) cover them.
To Make Changes to Your Service Pro Coverage:
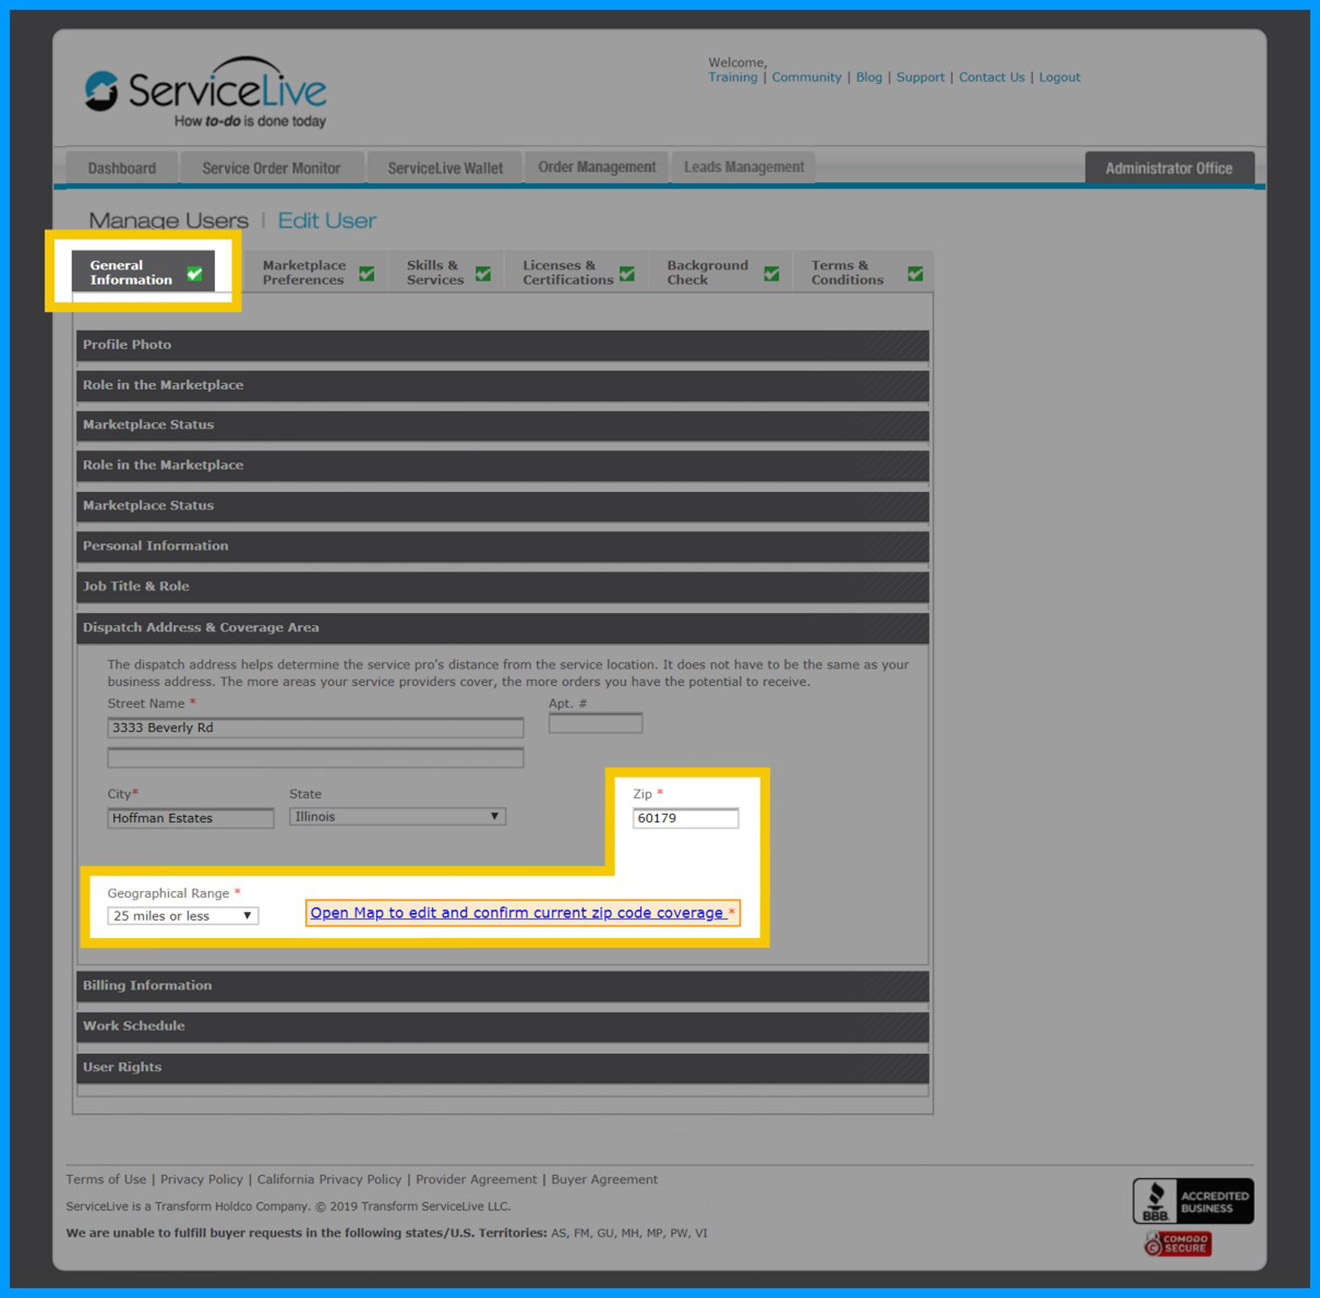
• Go into the Pro’s profile – on the General Information tab, scroll down to the Dispatch Address & Coverage Area section.
• The Zip and Geographical Range fields are used to determine which zip codes are covered by the Pro, based on the area’s radius. Make changes to the Geographical Range field for more, or less coverage.
• Use the Open Map to edit and confirm current zip code coverage link to specify which zip codes are actually covered by the Pro.
Important Note:
– When a new Provider profile is being created, and you are adding information to the Zip and Geographical Range fields for the first time, the system will prompt you to access the map to confirm the coverage zip codes. If you click the link at this point, the system will not remember the information you’ve entered on the General Information tab when you return. So, instead – continue filling out the General Information tab, and then click SAVE at the bottom of the page. This will let the system remember your information, but will still prompt you to access the map to confirm your coverage zip codes before you can continue to the next profile tab.
– When you make changes to the Zip and / or Geographical Range fields on an existing Provider profile, the system will also prompt you to access the map to confirm the coverage zip codes.
Note: All other sections on this page have been collapsed for this example.
• When you click the Open Map to edit and confirm current zip code coverage link, a validation map will display. This page also includes instructions on how to make, and save changes.

• You can use the Enter starting location search field to focus on a specific area, and use the + or – buttons in the top-left-hand corner of the map to zoom in and out of the area. Be sure to click on the + or – buttons, as you may end up selecting a zip code in that area of the map that your Pros don’t cover. If your mouse has a scroll wheel, you can also use this to zoom in and out.
• Add or remove zip codes by clicking on them. This lets you define the actual coverage area. Zip codes highlighted in green will let you know that area is covered. Zip codes that are not colored green are areas without coverage.
• Make sure you click Save Changes before leaving this page, or the system won’t retain the information!

• If you expand a Service Pro’s coverage by selecting a zip code outside of the state listed in their profile (for example, if a they travel outside of state lines to service customers), then the system will let you know you’ve selected coverage in a state different than what’s listed in their profile, and will ask you to confirm you or your company are licensed to work in the new state(s) by clicking SAVE.
• If you or your company are not licensed to work in the new state(s), un-check the box next to the state(s), and then click SAVE.

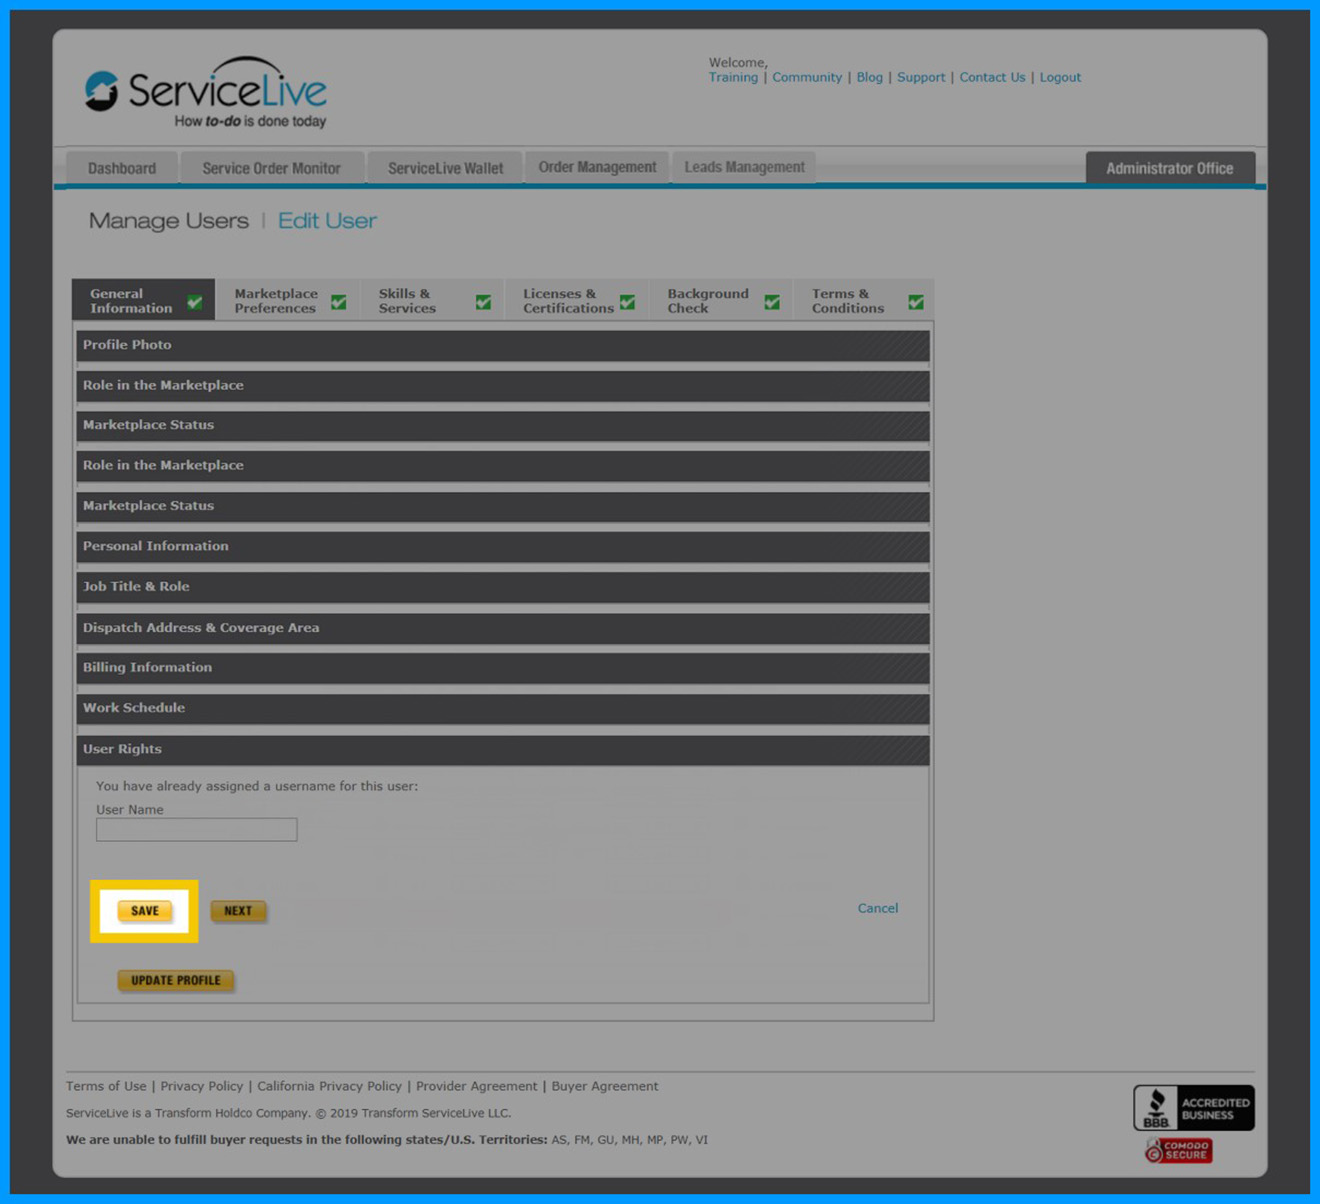
• When you’re done, scroll to the bottom of their profile, and click SAVE – this is the most important step! Do NOT click “UPDATE PROFILE” to save these changes! After the page refreshes, these changes will display in your Company’s Zip Code Coverage tab.
Note: All other sections on this page have been collapsed for this example.
Giving Permission to see and Make Changes to Coverage Areas:
To let someone on your team see and make changes to your company’s coverage areas, go into their profile.
• Open the Marketplace Preferences tab.
• Scroll down to the Provider Permissions section.
• Select the View Company’s Zip Code Coverage option.
• Then, scroll to the bottom of the page and click SAVE.

Note: All other sections on this page have been collapsed for this example.
Setting a Service Pro’s Profile to Active:
If you need to make sure your “Active” Service Pro(s) display in your coverage map, go into their profile.
• On the General Information tab – scroll down to the Market Status section.
• Make sure the Active option is selected.
• Then, scroll to the bottom of the page and click SAVE.

Note: All other sections on this page have been collapsed for this example.