This lesson explains how to review and manage the status of all your Select Provider Network (SPN) Providers and Firms. From Member Manager Tab, Buyers have ability to document problems or take action on the specific Firms and/or Service Pros membership. When working with the SPN Monitor, you must create your SPN Network and Campaign in the following order: 1. Create Network, 2. Create Campaign, 3. Routing Priorities (if applicable), 4. Campaign Monitor, 5. Member Manager, 6. SPN Monitor.
- When you login to ServiceLive, the Dashboard will open.
- Navigate to SPN Member Manager Tab:
- Click on
 tab on right of screen.
 - Click on
 link.
link.
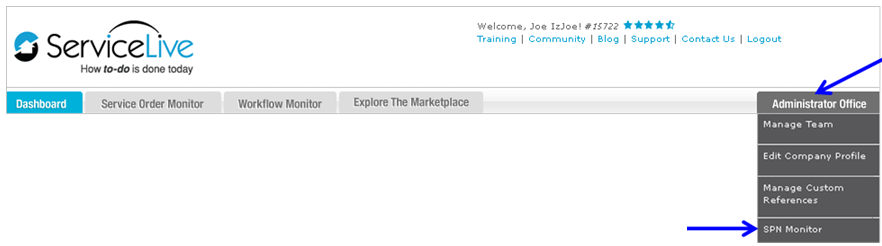
- Click on
- SPN Monitor Dashboard will open.
- Click on
 tab.
tab.

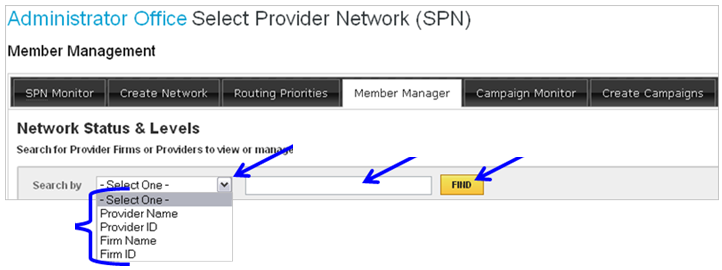
Member Manager – Search:
- Click on drop down arrow labeled “Search By”.
- Scroll down and select appropriate choice.
- Enter appropriate Name or ID into field provided.
Note: Can enter multiple Firm or Service Pro Names or IDs (up to 10) by separating Firms with semi-colon (;). - Click on
 button.
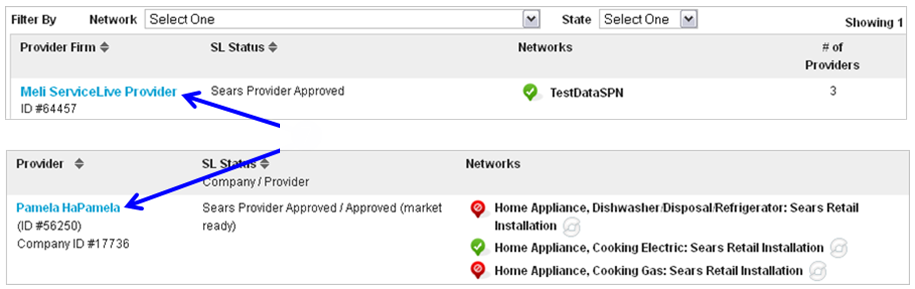
- Firm Member(s) information will categorically display:
Note: When you see in front of text in column header, you can click on text to change the displayed sort order of Provider Firms.
- Provider Firm = Firm Name and ID#.
Note: When searching by Service Pro this category displays as Provider and lists Service Pro Name and ID#. - SL Status = ServiceLive Status
- Networks = Name of SPN Firm is a member of.
- # of Providers = # of Providers that are ServiceLive Approved and available within Firm for SPN.

- Provider Firm = Firm Name and ID#.
- Click on Firm or Service Pro Title link.
Member Manager – Firm:
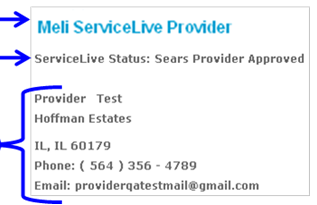
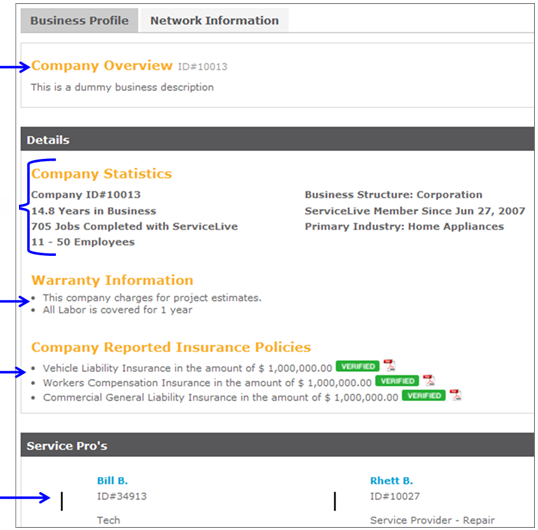
- After clicking on Provider Firm title, Provider Firm information will display in a new screen:

- Firm Name
- ServiceLive Status
- Firm Contact Information
- Business Profile Tab:
- Company Overview
- Company Statistics
- Warranty Information
- Company Reported Insurance Policies – It is important to note that you can no view the Company Reported Insurance Policies by clicking on the
 button when present. Only ServiceLive Verified Documents will be shown here. Out of Compliance (OOC) Documents will not be available for viewing here.
Note: To view these Documents, the Buyer Agent must have the Buyer SPN View DOC Permission enabled. - Service Pros that are a part of Firm
Note: To view Service Pro Profile that appears after clicking on Pro name, see Manage Member – Providers (Service Pros) on page 9.
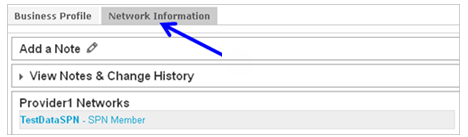
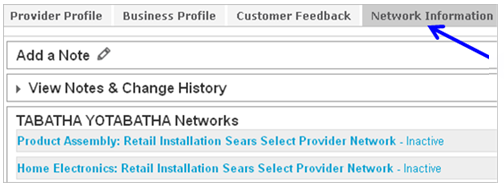
- Network Information Tab – Add a Note:
Note: In this section, Buyers document and can take action on Firm Membership.- Click on
 tab.
tab.
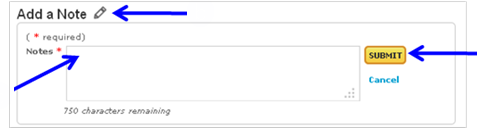
- Click on
 next to Add a Note to document any comments or conversations to Firm Profile.
 - Enter Note in field provided.
- Click on
 button.
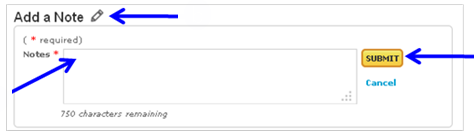
Note: See Notes Tab lesson in Close and Pay a Service Order course to view Notes.
- Click on
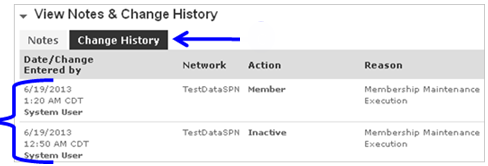
- Network Information Tab – View Notes and Change History:
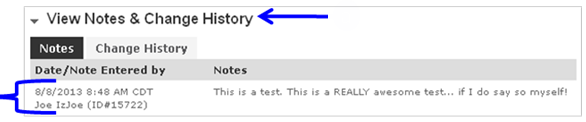
- Click on
 link to display previous Notes and Change History.
 - Note and Note details will display.
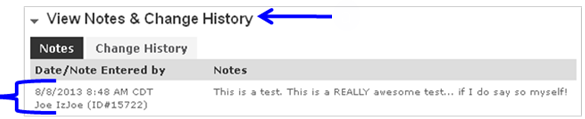
- Click on
 tab to display SPN Status Change History.
 - Change details will display.
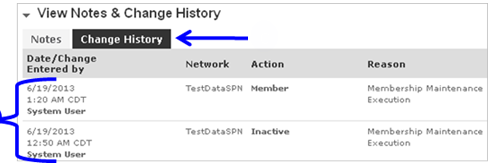
- Click on
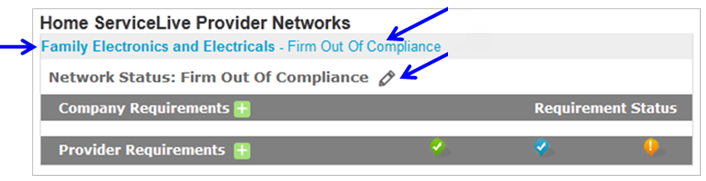
- Network Information Tab – Provider SPN:
- Click on blue link to expand SPN information.
- Members Network Status (i.e. SPN Member, Out of Compliance or SPN Firm Removed).
- Click on button to change Provider Network Status.
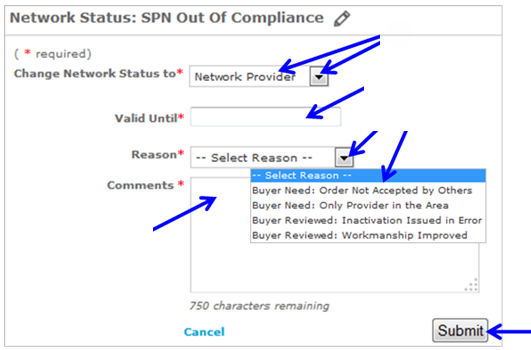
- Network Information Tab –Reactivate Out of Compliance Firm:
- Click drop down arrow labeled “Change Network Status to” and select “Network Provider”.
- Click box labeled “Valid Until” and select appropriate date for override timeframe.
- Click on drop down arrow labeled “Reason,” scroll down and select reason code for membership status change.
- Enter Comments in box provided.
- Click Submit button.
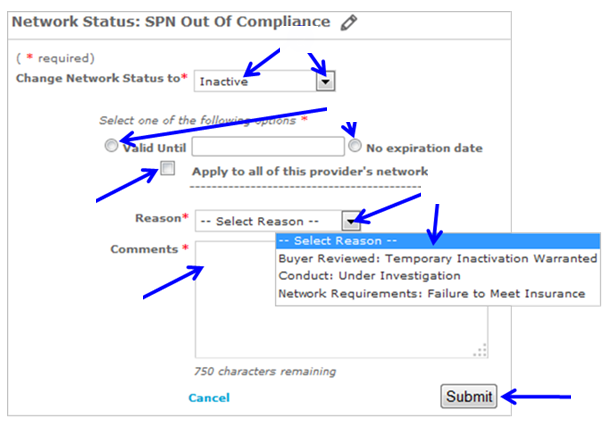
- Network Information Tab – Inactivate Firms SPN Membership Status:
- To mark Firm as Inactive, click drop down arrow labeled “Change Network Status to” and select “Inactive.”
- Select appropriate radio button (i.e. Valid Until or No Expiration Date) to set override timeframe for membership status change.
Note: If you select “Valid Until,” click box immediately following to a select date Network Status override timeframe. - Select checkbox labeled “Apply to all of this Provider’s networks” if you desire to change this Firms Network status for ALL SPNs that they are a part of.
- Click on drop down arrow labeled “Reason,” scroll down and select reason code for membership status change.
- Enter Comments in box provided.
- Click Submit button.
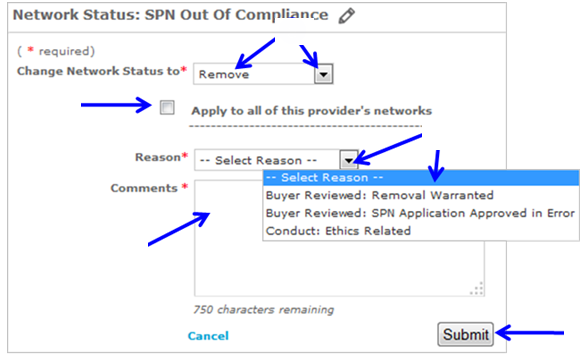
- Network Information Tab – Remove Firms SPN Membership:
- To Change Firms Network Status to Remove, click drop down arrow labeled “Change Network Status to” and select “Remove.”
- Select checkbox labeled “Apply to all of this Provider’s networks” if you desire to change this Firms Network status for ALL SPNs that they are a part of.
- Click on drop down arrow labeled “Reason,” scroll down and select reason code for membership status change.
Note: Reason choice codes available will differ based on status choice. - Enter Comments in box provided.
- Click Submit button.
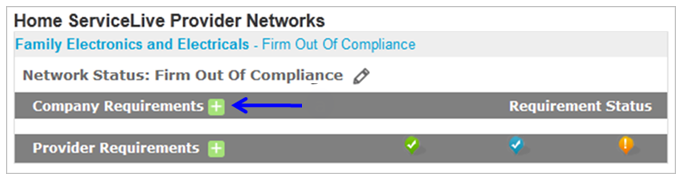
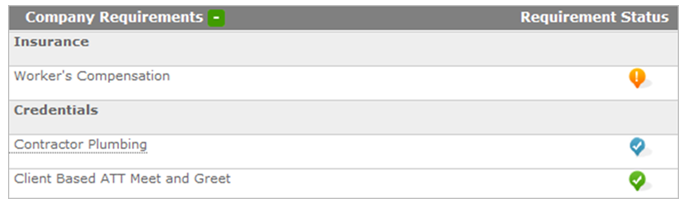
- Network Information Tab – Requirements:
Note: This gives Buyer an overview of what SPN requirements are missing.- Click on
 next to Company Requirements.
Note: Company requirements are licenses that are required at Firm level.
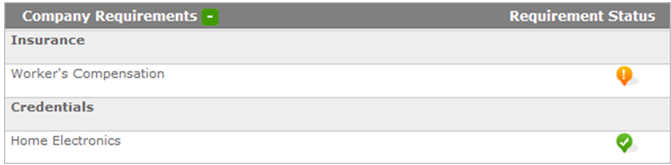
- Insurance and Credential requirements for the SPN display. The
 symbol represents compliance. The
  symbol represents in compliance due to Buyer override. The
  symbol represents requirements not met.
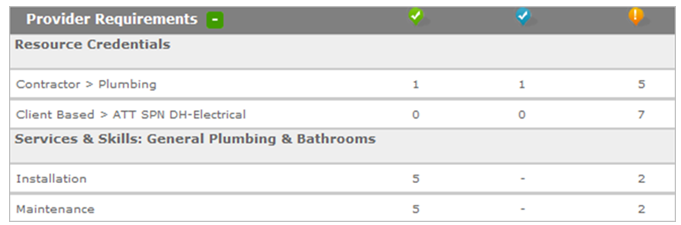
- Click on next to Provider Requirements.
Note: Provider requirements are licenses that are required a Service Pro level.
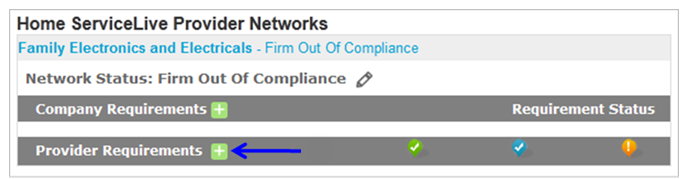
- Individual Provider requirements for the SPN display.
- The symbol represents compliance and displays the number of Service Pros that are currently in compliance with requirement.
- The symbol represents in compliance due to Buyer override and displays the number of Service Pros that are currently in compliance with requirement due to Buyer override.
- The symbol represents requirements not met and displays the number of Service Pros that are currently not in compliance with requirement.
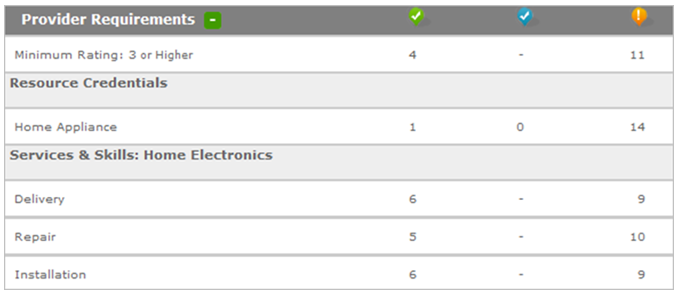
- The
- Click on
- Click on
 in the top, right hand corner to exit selected Provider Firm Member Manager.
Manage Member – Providers (Service Pros):
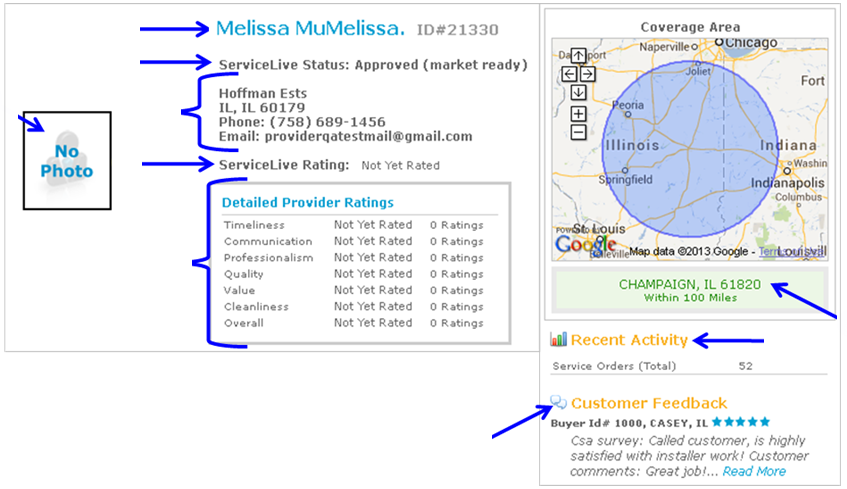
- After clicking on Service Pro title, Service Pro information will display in new screen.

- Service Pro Name/ID
- Service Pro Photo
Note: This appears only if Provider Firm enters it when creating Service Pro profile. - ServiceLive Status
- Provider Firm Contact Information
- ServiceLive Rating
- Detailed Service Pro Ratings
- Service Pro Coverage Area
- Recent Activity
- Customer Feedback
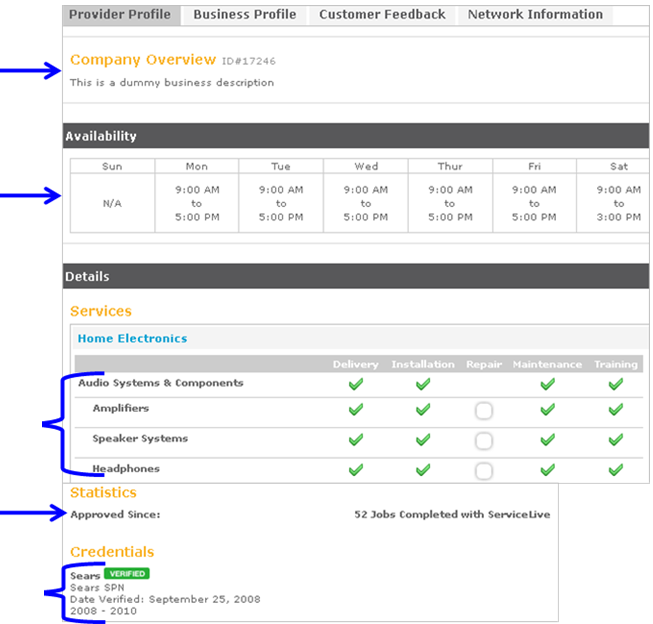
- Provider Profile Tab:
- Company Overview/ID#
- Service Pro Work Availability
- Services Service Pro can Perform
- Service Pro Statistics
- Service Pro Credentials
- Business Profile Tab:
- Click on
 tab.
tab. - Company Overview
- Company Statistics
- Warranty Information
- Company Reported Insurance Policies
- Service Pros that are a part of Firm
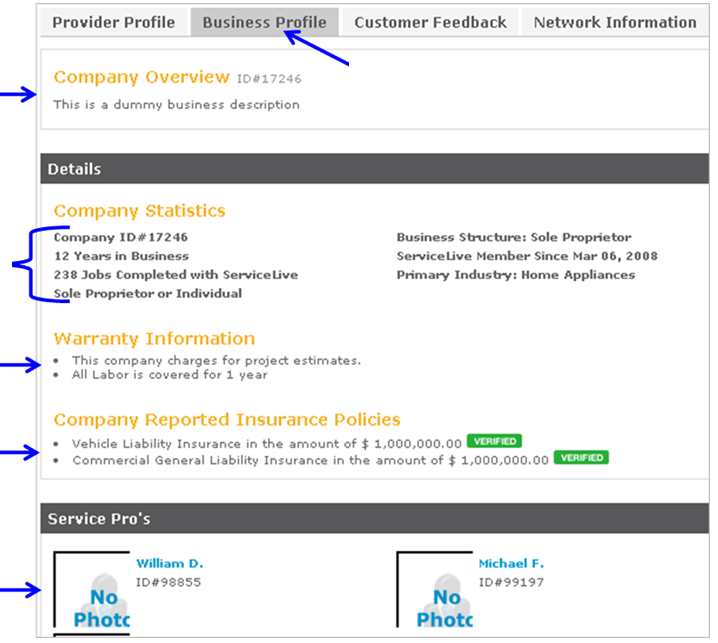
- Click on
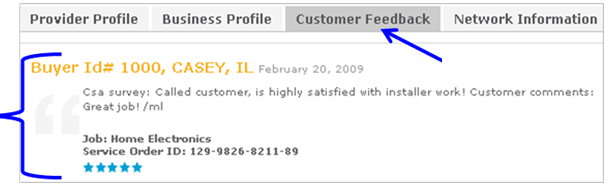
- Customer Feedback Tab:
- Click on
 tab.
tab. - Any customer feedback will display in this section.
- Click on
- Network Information Tab – Add a Note:
Note: In this section, Buyer documents and can take action on Firm and Service Pro Membership. If Service Pro is not part of a SPN, this tab will not appear. A Firm may qualify to be a part of an SPN but Service Pro may not. Once Note is entered, system tracks it in the View Notes & Change History.- Click on tab.
- Click on next to Add a Note to document any comments or conversations to Service Pro (and corresponding Firm) Profile.
- Enter Note in field.
- Click on
 button.
Note: See Notes Tab lesson in Close and Pay a Service Order course to view Notes.
- Click on
- Network Information Tab – View Notes and Change History:
- Click on link to display previous Notes and Change History.
- Note and note details will display.
- Click on tab to display SPN Status Change History.
- Change details will display.
- Click on
- Network Information Tab –Reactivate Out of Compliance Firm:
- Click drop down arrow labeled “Change Network Status to” and select “Network Provider”.
- Click box labeled “Valid Until” and select appropriate date for override timeframe.
- Click on drop down arrow labeled “Reason,” scroll down and select reason code for membership status change.
- Enter Comments in box provided.
- Click Submit button.
- Network Information Tab – Inactivate Firms SPN Membership Status:
- To mark Firm as Inactive, click drop down arrow labeled “Change Network Status to” and select “Inactive.”
- Select appropriate radio button (i.e. Valid Until or No Expiration Date) to set override timeframe for membership status change.
Note: If you select “Valid Until,” click box immediately following to a select date Network Status override timeframe. - Select checkbox labeled “Apply to all of this Provider’s networks” if you desire to change this Firms Network status for ALL SPNs that they are a part of.
- Click on drop down arrow labeled “Reason,” scroll down and select reason code for membership status change.
- Enter Comments in box provided.
- Click Submit button.
- Network Information Tab – Remove Firms SPN Membership:
- To Change Firms Network Status to Remove, click drop down arrow labeled “Change Network Status to” and select “Remove.”
- Select checkbox labeled “Apply to all of this Provider’s networks” if you desire to change this Firms Network status for ALL SPNs that they are a part of.
- Click on drop down arrow labeled “Reason,” scroll down and select reason code for membership status change.
Note: Reason choice codes available will differ based on status choice. - Enter Comments in box provided.
- Click Submit button.
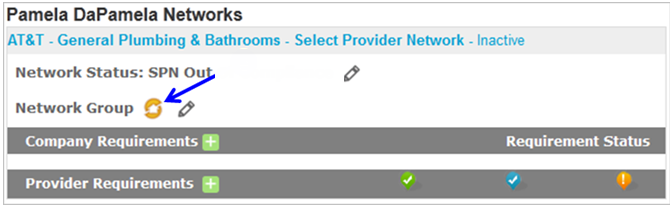
- Network Information Tab – Network Group (Tiered Routing):
Note: See Routing Priorities Tab lesson in Admin Office Extended – SPN Monitor course for further details.- Click on button to change Network Group (Tiered Routing).
- Click on the appropriate radio button to Change Network Group.
- The
 (gold) symbol represents tier one for routing.
 - The
 (silver) symbol represents tier two for routing.
 - The
 (bronze) symbol represents tier three for routing.
 - The
 (white) symbol represents NO tier for routing.
- The
- Enter comments in field.
- Click on button.
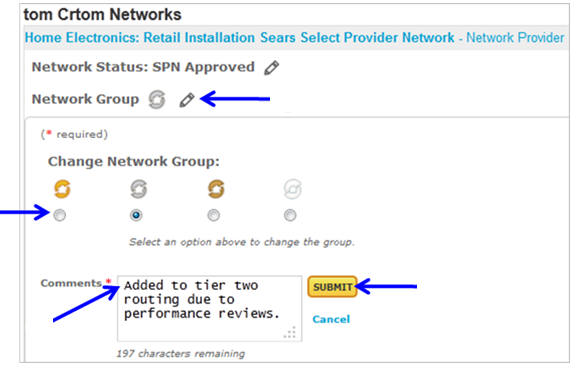
- New Network Group will display.
- Click on
- Network Information Tab – Requirements:
Note: This gives Buyer an overview of what SPN requirements are missing.- Click on next to Company Requirements.
Note: Company requirements are licenses that are required at Firm level.
- Insurance and Credential requirements for the SPN display. The symbol represents compliance. The symbol represents in compliance due to Buyer override. The symbol represents requirements not met.
- Click on next to Provider Requirements.
Note: Company requirements are licenses that are required a Firm level.
- Individual Provider requirements for the SPN display. The symbol represents compliance. The symbol represents in compliance due to Buyer override. The symbol represents requirements not met.
- Click on
- Click on in the top, right hand corner to exit selected Provider Firm Member Manager.