This lesson explains how to create a Campaign for a SPN. You can create campaigns based on a set of criteria, a saved campaign or by Provider Firms. Creating campaigns triggers SPN invitations that Firms will receive if they meet all or part of the criteria required by the network. When working with the SPN Monitor, you must create your SPN Network and Campaign in the following order: 1. Create Network, 2. Create Campaign, 3. Routing Priorities (if applicable), 4. Campaign Monitor, 5. Member Manager, 6. SPN Monitor.
- When you login to ServiceLive, the Dashboard will open.
- Navigate to Create Campaigns Tab:
- Click on
 tab on right of screen.
 - Click on
 link.
link.
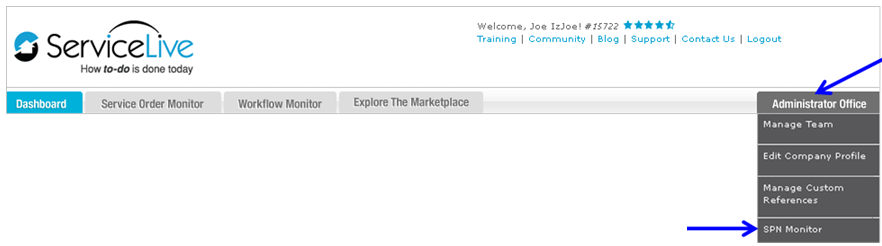
- Click on
- SPN Monitor Dashboard will open.
- Click on
 tab.
tab.

Create New Campaigns by Criteria
We recommend using Campaign by Criteria for recruitment efforts requiring multiple Provider Firms to be invited. See Create New Campaigns by Provider below if your need is small and are only inviting one or two Provider Firms to SPN.
- Click on
 tab if not already displayed.
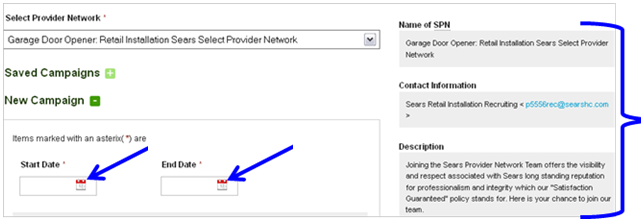
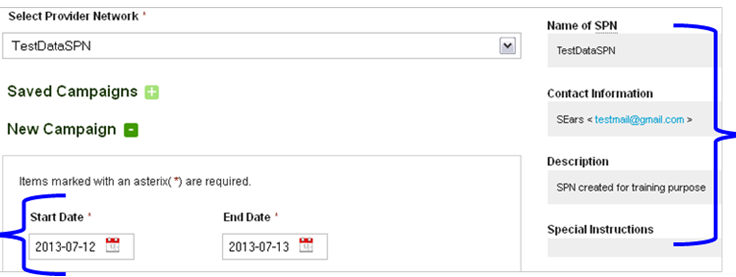
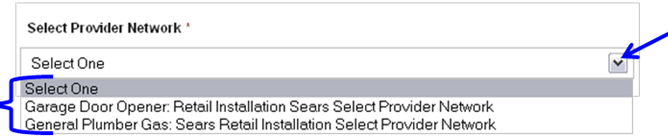
 - Click on drop down arrow under “Select Provider Network”.
- Scroll down and select appropriate SPN for Campaign invitations.
Note: This list displays SPNs you previously created. When you select SPN, Campaign creation form will automatically fill with information such as insurance, skills, required ratings, etc. from that SPN. You can edit any of this information as appropriate for your new campaign. Refer to Create Network Tab lesson in Admin Office Extended – SPN Monitor (Requires Password) course if you need to create SPN.

- Number of Firms that match pre-established SPN criteria.
- Corresponding number of Service Pros that match SPN criteria.
Note: This information will change if you select a different SPN for Campaign.

- SPN details listed on right of screen for quick reference.
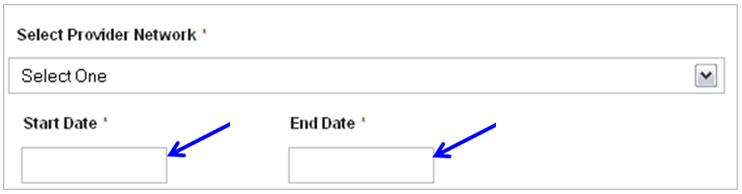
- Click on
 button under Start Date and select appropriate beginning date of Campaign.
 - Click on button under End Date and select appropriate ending date of Campaign.
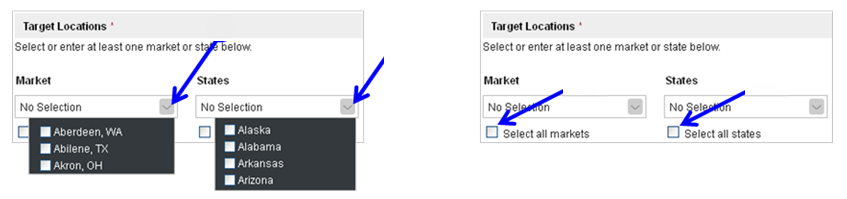
- Target Locations:
Note: You MUST select at least one market OR state. You may select multiple markets OR multiple states, but you cannot select a market AND a state unless the state matches the designated market state.- Click on drop down arrow to display geographical Market filter choices. Click on appropriate market(s), then click outside of Market filter and Service Orders within market selected will display.
- OR select the checkbox labeled “Select all markets”.
- OR click on drop down arrow to display geographical State filter choices. Click on appropriate state(s), then click outside of State filter and Service Orders within state selected will display.
- OR select the checkbox labeled “Select all states”.
- Click
 button to view number of Firms and Service Pros that match campaign criteria.
 - Number of Firms that match SPN Campaign will display.
- Corresponding number of Service Pros that match SPN Campaign.

- Ratings and Language:
Note: This section is not required.- Click on drop down arrow labeled “Minimum Rating”.
- Scroll down and select appropriate desired minimum rating for Service Pro.
Note: You do not have to select a desired minimum rating. If you select a minimum rating, we recommend that you select 3-5 stars to not limit SPN Provider pool. - AND/OR click on the checkbox labeled “Include non-rated providers”.
Note: It can take time for Service Pros to accumulate ratings. Therefore, it might be advantageous to accept Service Pros that have not yet been rated. - Click on drop down arrow to display Language Click on appropriate language(s), and then click outside of language list to apply choices.
- Enter minimum number of Service Orders for Firm to have previously completed for SPN membership.
Note: This feature is rarely used.

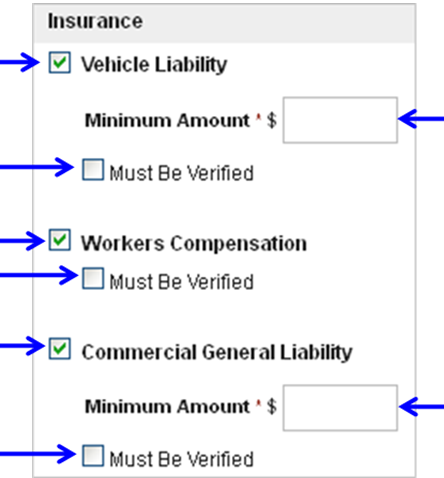
- Insurance:
- Click on checkbox labeled “Vehicle Liability” if you desire SPN Firm members to carry Vehicle insurance.
- Enter appropriate minimum dollar amount of Vehicle Liability coverage you desire.
- Click on checkbox labeled “Must be Verified” if you desire Firm Vehicle insurance to be verified.
Note: Verification is done by ServiceLive Compliance team to ensure that insurance documents meet the Verified requirements established by ServiceLive. - Click on checkbox labeled “Workers Compensation” if you desire SPN Firm members to carry Workers Compensation coverage according to their state requirements.
- Click on checkbox labeled “Must be Verified” if you desire Workers Compensation coverage to be verified.
Note: Verification is done by ServiceLive Compliance team to ensure that insurance documents meet the Verified requirements established by ServiceLive. - Click on checkbox labeled “Commercial General Liability” if you desire SPN Firm members to carry Commercial General Liability coverage.
- Enter appropriate minimum dollar amount of Commercial General Liability coverage you desire.
- Click on checkbox labeled “Must be Verified” if you desire Firm coverage to be verified.
Note: Verification is done by ServiceLive Compliance team to ensure that insurance documents meet the Verified requirements established by ServiceLive.
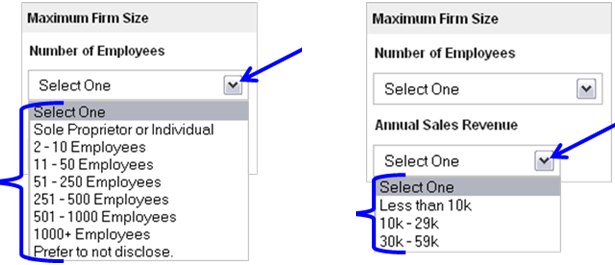
- Maximum Firm Size:
Note: Maximum Firm Size may be of value if the SPN requires a certain size Firm to support the Service Order volume. This section is optional.- Click on drop down arrow labeled “Number of Employees”.
- Scroll down and select appropriate choice.
- Click on drop down arrow labeled “Annual Sales Revenue”.
- Scroll down and select appropriate choice.
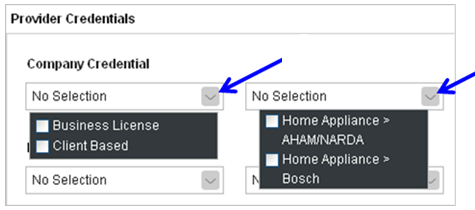
- Provider Credentials:
This section is required when creating a SPN if the Buyer requires SPN Firm Members to carry a specific license or credential. This section also allows Buyer to establish a license and/or credential requirement at the Service Pro level.
Note: We do NOT recommend that the SPN require a license/credential at the Firm AND Service Pro level, as such requirements may be extremely difficult to meet.- Click on
 option.
 - Click on the first drop down arrow under “Company Credential” to select required Credentials. Click on appropriate Company Credential(s), then click outside of Company Credential list to apply choices.
- Company Credential means that desired license is required at the Firm level.
- Click on the second drop down arrow under “Company Credential” to select more specific required Credentials. Click on appropriate Company Credential(s), then click outside of Company Credential list to apply choices.
Note: Nothing will appear in this drop down list unless you select at least one item from first list.
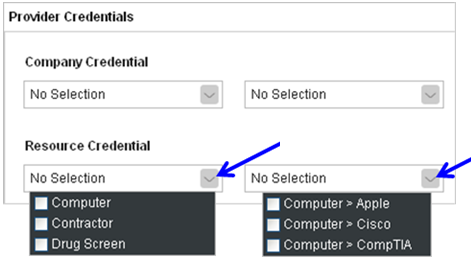
- Click on the first drop down arrow under “Resource Credential” to select required Credentials. Click on appropriate Resource Credential(s), then click outside of Resource Credential list to apply choices.
- Resource Credential means that desired license is required at the Service Pro level.
- Click on the second drop down arrow under “Resource Credential” to select more specific required Credentials. Click on appropriate Resource Credential(s), then click outside of Resource Credential list to apply choices.
Note: Nothing will appear in this drop down list unless you select at least one item from first list.
- Click on
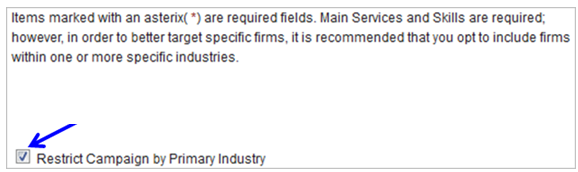
- Services and Skills:
- Click on
 link.
link. - Click on checkbox labeled “Restrict Campaign by Primary Industry”, to ensure that only Firms that match the Primary Industry(s) selected will be invited to join your network.
- Assess ahead of time exactly what this SPN/Campaign requires. Be specific as needed, yet general enough so not to limit SPN Provider pool.
- When selecting services, we recommend NOT to mix industries. Mixing industries will narrow Firms and Providers that qualify to serve in SPN.
- If there are questions as you set up you SPN Network, contact your designated ServiceLive representative.
- If “Restrict Campaign by Primary Industry” is selected, then click on drop down arrows to select Primary Industry, Main Services, and Skills desired.
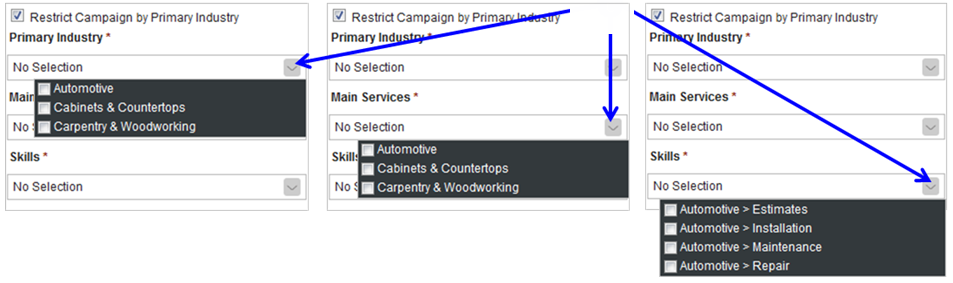
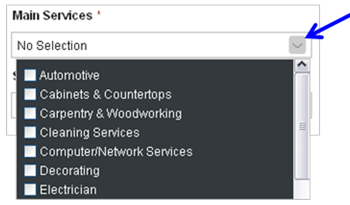
- OR click on drop down arrow labeled “Main Services”. Click on appropriate Main Service(s) required for SPN, then click outside of Main Services list to apply choices.
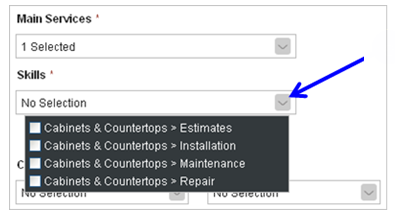
- Click on drop down arrow labeled “Skills”. Click on appropriate Skill(s) within Main Service(s) required for SPN, then click outside of Skills list to apply choices.
Note: Nothing will appear in this drop down list unless you select at least one Main Service.
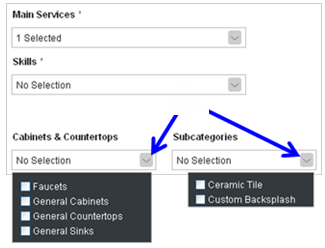
- Fields below will populate according to Services and/or Skills selected in previous steps.
- Click on drop down arrow for each additional field and select additional choices. Click on appropriate choice(s) from list, then click outside of list to apply choices.
Note: Nothing will appear in this drop down list unless at least one Main Service and one Skill are selected. Select subcategories carefully as Service Pros will be required to meet every single Skill required by SPN. The more Skills selected, the more complicated it becomes to reach the Member Approved Status. This step is not required for Campaign creation.
- Click on
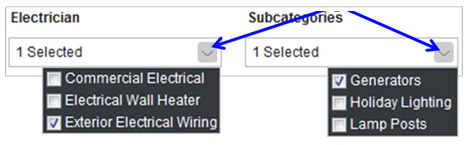
- Specify Categories:
- Click on
 link.
link. - Click on drop down arrows to select categories that are more specific for your SPN Campaign.
- Click on
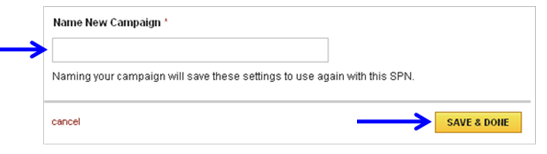
- Name and Save Campaign:
- Enter Campaign name in field labeled “Name New Campaign”.
Note: For reporting purposes, it is important to use the following naming convention for your campaign (must use spaces in naming):- BuyerCompanyName – CampaignName – Select Provider Network
- Ex: AT&T – Heating & Cooling – Select Provider Network
- Ex: Sears Retail Installation – General Plumbing Gas – Select Provider Network
- Click on
 button.
- Enter Campaign name in field labeled “Name New Campaign”.
Create a New Campaign by Criteria based on Saved Campaign
We recommend Campaign by Criteria for recruitment efforts requiring multiple Provider Firms to be invited. Follow the next steps to use a previously created campaign as a template for a new campaign.
- Click on
 link.
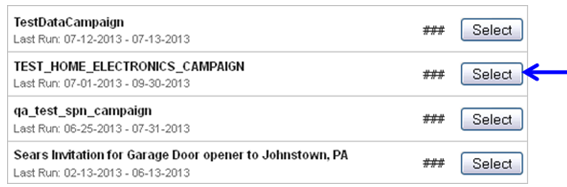
link. - Scroll down and click on
 button for Saved Campaign you would like to use.
- SPN details display on right side of screen.
- Campaign form automatically fills with Campaign details.
- Scroll through Campaign details and change information as appropriate. (i.e. Campaign dates, etc.)
Note: Refer to Create a New Campaign steps in this lesson to change Campaign details.
Create New Campaign to Firms
We recommend Campaign by Firm for recruitment efforts requiring one or two Provider Firms. See Create New Campaigns by Criteria above if your recruitment efforts require multiple Firms to be invited.
- Click on
 tab.
tab.

- Click on drop down arrow under “Select Provider Network”.
- Scroll down and select appropriate SPN for Campaign.
Note: This list displays SPNs you previously created. Refer to Create Network Tab lesson in Admin Office Extended – SPN Monitor (Requires Password) course.
- Create Campaign Dates:
- Click in field under Start Date and select appropriate beginning date of Campaign.
- Click in field under End Date and select appropriate ending date of Campaign.
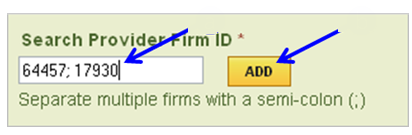
- Search Providers:
- Enter Provider Firm ID’s into field provided.
Note: You may enter multiple ID’s separated by a semi-colon (;). - Click on
 button.
Note: You must select at least one Firm Id, the following warning will appear if you fail to do so.

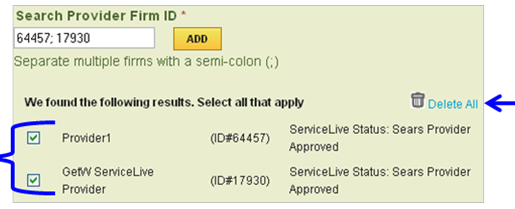
- Select (or deselect) checkboxes for Firms as is appropriate.
- OR click on
 link to clear all Providers from search.
- Enter Provider Firm ID’s into field provided.
- Name and Save Campaign:
- Enter Campaign name in field labeled “Name New Campaign” using the following naming convention:
Note: For reporting purposes, it is important to use the following naming convention for your campaign (must use spaces in naming):- BuyerCompanyName – CampaignName – Select Provider Network
- Ex: AT&T – Heating & Cooling – Select Provider Network
- Ex: Sears Retail Installation – General Plumbing Gas – Select Provider Network
- Click on button.
- ServiceLive Compliance will be notified once a campaign is created. They will review it, and approve it.
Note: If unauthorized or inappropriate content is found, ServiceLive Compliance will contact SPN Manager to explain required changes that need to be made before approval.
- Enter Campaign name in field labeled “Name New Campaign” using the following naming convention:
- Refer to Campaign Monitor Tab lesson in Admin Office Extended – SPN Monitor (Requires Password) course.