This lesson explains how to locate and use Workflow Monitor tab and Workflow Monitor Queues. Workflow Monitor Queues allow Buyer to assign specific Service Order tasks to a Queue which can be managed by one or more individuals. The ServiceLive Platform includes sophisticated logic to manage and track Service Orders (work orders) throughout their life from creation to completion and closure. To aid the Buyer Operations and Call Center Teams in managing the workflow of service events or work orders flowing through system, ServiceLive has deployed Workflow Monitor (or “WFM”) functionality.
ServiceLive WFM enables Agents and managers to get insight to the state of their Service Orders driven by common business scenarios. Agents can dive into the detail of individual orders, assess, and take remedial action if required. The objective is to help operations teams facilitate the flow of orders and ensure the health of the overall business.
- Lifecycle/Status of a Service Order:
- Draft – After Buyer creates a new Service Order OR edits a Draft Service Order AND saves as Draft, Service Order will be located on Draft tab until Buyer Posts or Deletes Service Order. Provider will not be able to view until Buyer posts Service Order.
- Posted
- Buyer Posts a Name Your Price Service Order, which they identify price. Buyer can view from Posted Provider can view/take action from Received tab.
- Buyer Posts a Bid Request Service Order, which they ask for bids.
- Bid Requests functionality can be enabled in ServiceLive at Buyers request.
- If not enabled, Buyer will not see this tab.
- Buyer will be able to view Bid Request Service Orders from Posted Provider can view/take action from Bid Requests tab.
- Accepted – On Name Your Price, once Provider Accepts or Buyer Accepts Provider’s Counter Offer, Service Order will change to Accepted status and will be located on Accepted tab until Service Date/Time. On Bid Requests, once Buyer Accepts Bid, Service Order will change to Accepted status and will be located on Accepted tab until Service Date/Time.
- Active – Once the Service Date/Time occurs, Service Order will change to Active status and will be located on Today tab.
- Completed – Once Provider submits Service Order for payment, Service Order will change to Completed status and will be located on Today tab.
- Closed – Once Buyer Closes and Pays, Service Order will change to Closed status and will be located on Inactive tab.
- Service Orders can be in four other statuses: Cancelled and Voided status located on Inactive tab, Problem status located on Problem tab, and Expired status located on Today tab.
- When you login to ServiceLive, the Dashboard tab will open.
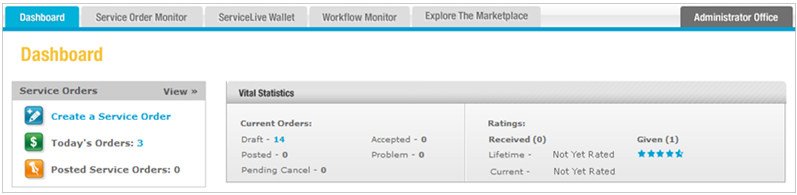
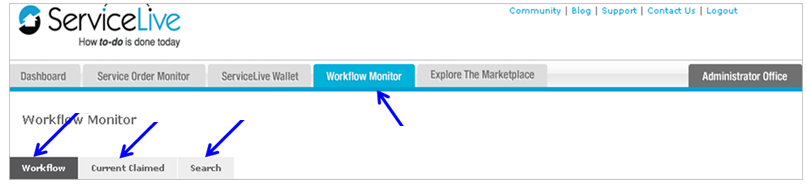
- Click on Workflow Monitor tab:
- The Workflow Monitor tab has three (3) tabs that are available to Manage Workflow. Details are available in separate steps below for each of these tabs.
- Workflow tab (automatically opens to this tab)
- Current Claimed tab
- Search tab
- Workflow tab will open:
- Queues will display.
Note: Queues and process for managing each Queue are determined by Buyer.

- Queues will display.
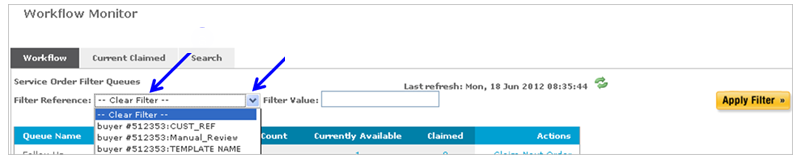
- Filters available on Workflow tab:
Note: This section explains how you can filter and search information on Workflow Monitor tab. You may select Filter Reference and then enter Filter Value.- Filter Reference = Defaults to Clear Filter. All Service Order Queues will display.
- Click on drop down arrow in Filter Reference to display choices.
Custom Reference Filter
- Scroll down and click on appropriate choice. (i.e. CUST_REF)
- Type appropriate information in Filter Value box (i.e. 2954).
- Click on
 button.
- All Service Orders in all Queues that have (i.e. Custom Reference Field #2954) will display.
Note: For example, if Buyer wants to pull all Service Orders for a specific store number, they would use this.

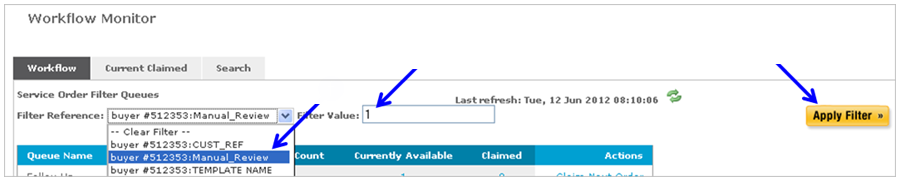
Manual Review Filter
- All Service Orders in all Queues that have (i.e. Custom Reference Field #2954) will display.
- Scroll down and click on appropriate choice. (i.e. Manual_Review)
- Type appropriate information in Filter Value box (i.e. 1 – Filter Value for Manual Review = 1).
- Click on button.
- All Service Orders that a store agent flagged in CAT by answering Manual Review (Yes) will display.
- Typically, store personnel entered special instructions in CAT and these will flow into ServiceLive for review.
- Manual Review orders will NOT get auto posted, so Buyer agent needs to review and take appropriate action.
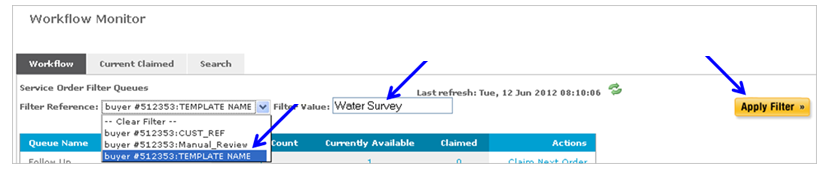
Template Name Filter
- Scroll down and click on appropriate choice. (i.e. Template_Name)
- Type appropriate information in Filter Value box (i.e. Water Survey)
- Click on button.
- Template names available to search on are available from the ServiceLive Administrator.
- Template names available to search on are available from the ServiceLive Administrator.
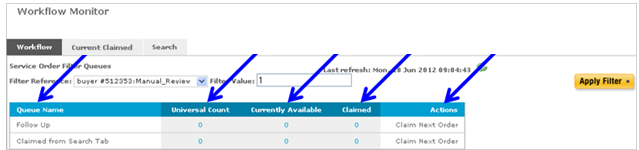
- Information that displays on Workflow tab:
- Queue Name = Represents type of action that needs to be taken on Service Order in that Queue.
- Universal Count = Total count of Service Orders in Queue (Both claimed and unclaimed).
- Currently Available = Number of Service Orders available in Queue for agents to work on.
- Claimed = Number of Service Orders in Queue that are currently being worked on by agents.
- Actions = Next available Service Order in Queue will be opened by clicking on “Claim Next Order”.
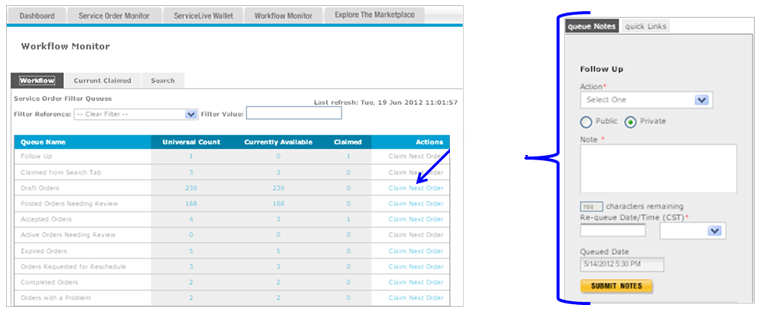
- Claim Next Order:
- Scroll to appropriate Queue you want to work/take action on, click on
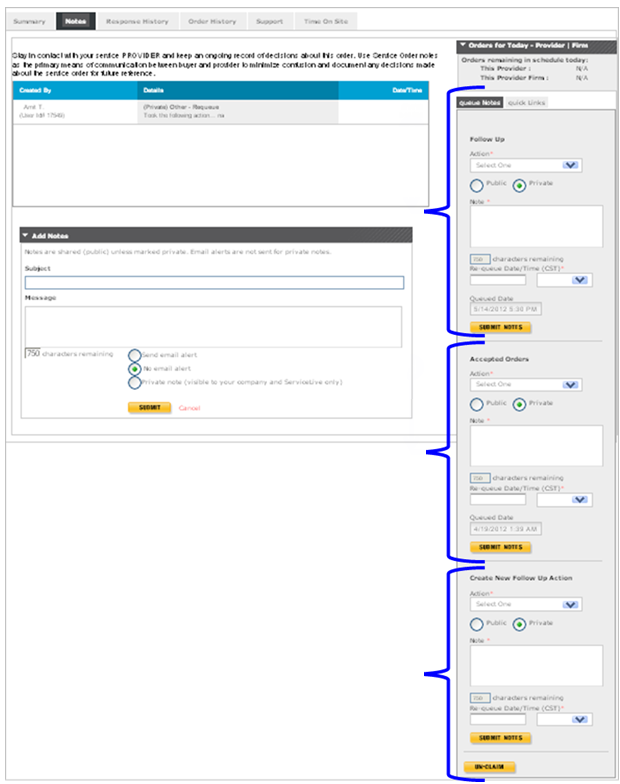
- Once you click on Claim Next Order link, widget will display on right side of screen.
- Queue Widgets allow you the ability to work Queues by selecting “Action” and submitting “Notes”.
- A Service Order can be in one or multiple Queues.
- If Service Order is in multiple Queues, all Queues will be display as sections of widget.
- In addition, there will always be a Create New Follow Up Action section on widget.
- Primary Queue will display on top right side of screen.
- Once you click Claim Next Order, this becomes the Primary Queue and will display first.
- Primary Queue is only Queue that requires “Action”.
- You can take “Action” on all Queues displayed in widget.
- This will improve productivity and reduce rework on the same Service Order from multiple Queues.
- Secondary Queue(s) will display on middle right side of screen.
- Remember, the same Service Order can also be Queued in multiple Secondary Queues and displayed after Primary Queue.
- Create New Follow Up Action will display on bottom right side of screen (last Queue).
- Many of the Queues have the ability to select a Follow Up Action from the Queue, however in some Queues there are no Follow Up Action choices and this is why you might use the Create New Follow Up Action section on the widget.
- The Create New Follow Up Queue section is just like Primary Queue And Secondary Queue(s) sections.
Note: One significant difference between Follow Up Queue and all other Queues is that a Service Order may be Queued to Follow Up Queue multiple times.
Remember: All Queues on widget function the same way. Primary Queue is only Queue that requires “Action”. You can take “Action” on all Queues displayed in widget.Steps to “Work Queues”:
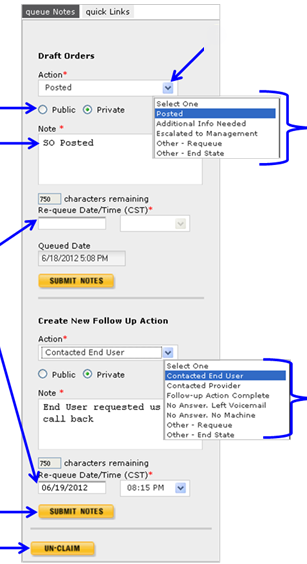
- Click on drop down arrow and list of Actions will display.
- Click on appropriate Action choice and default Notes automatically display in Notes tab.
Note: Queues Notes submitted are available for review in Notes tab. - Click on radio button in front of Public or Private. (Defaults to Private)
- Public Notes are visible to all Providers, Buyer, and ServiceLive Administrative team.
- Private Notes are visible to Buyer & ServiceLive Administrative team.
- You can add additional information in Note Box as appropriate.
Note: Depending on Action choice, default Notes might only be the beginning of Note needed (i.e. Escalated to Management due to …) and will require you to add additional information in Notes. - Re-queue Date/Time (are displayed and required) only if you select one of the Requeue Actions versus End State/Action Completed. Date/time will auto populate, but you can also change.
- End State/Action Completed (i.e. Posted, Voided, Reposted, Other-End State, etc.) are actions that move Service Order along in Lifecycle of Service Order to another status.
- Requeue (i.e. Contacted End User, No Answer. Left Voicemail, Other-Requeue, etc.) are actions that require further Follow Up and will be put in Follow Up Queue.
- Click on
 button. These Notes will display on Notes tab.
 - Click on
 button located at the bottom of the last Queue displayed on widget. This will remove Service Order from individual agents Queue and move it forward to action that you selected. (i.e. Requeue or End State).
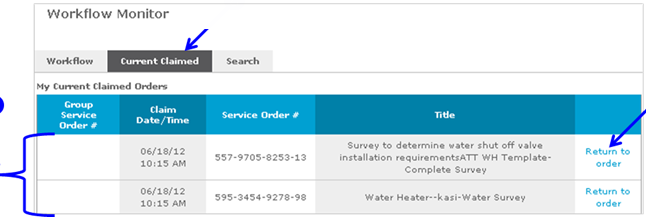
- Click on Current Claimed tab:
- This tab will display all Service Orders for all Queues individual agent has claimed within last 15 minutes.
- You should take action (End State/Complete Action or Requeue) on Service Order by clicking on
 to open Service Order. Follow steps previously described in this lesson for how to Claim Next Order.
Note: If an individual agent that has claimed a Service Order and doesn’t take action on that Service Order for 15 minutes, the ServiceLive system will automatically put claimed Service Order(s) back into appropriate Queue(s) and another agent will be able to work Service Order.
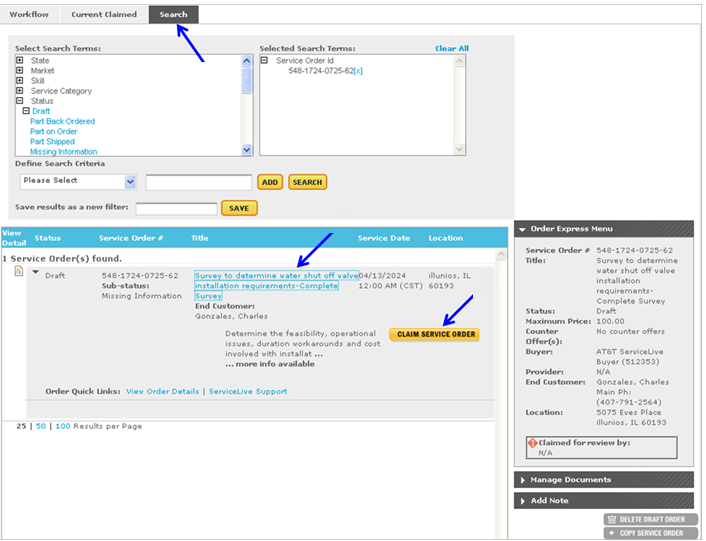
- Click on Search tab:
Note: If you want to locate a specific Service Order and you are not sure which Queue it is in, you can use the Search tab.
Note: Refer to Search Tab lesson in Service Order Monitor course for details on how to Search.- Once Search is completed, click on appropriate Title link to view Service Order details.
- Click on
 to take action on Service Order. Follow steps previously described in this lesson for how to Claim Next Order.