This lesson explains how to scan and save documents so you are able to upload documents into ServiceLive. You must have a scanner or all in one printer to scan documents.
Note: This is a general overview and demonstrates one type of scanning software, so instructions may vary for different types of scanners/scanning software.
- A scanner is equipment that allows you to copy documents, photos or images. It is similar to a copy machine, but instead of creating an image on a piece of paper, the scanner creates a digital image that
displays and saves on a computer. - All scanners come with software that allows the scanner to communicate with your computer. You must install the software on your computer prior to using the scanner.
- Instructions on using scanners are very hardware/software specific due to different manufacturers. This manual will provide you with basic scanning instructions regardless of brands.
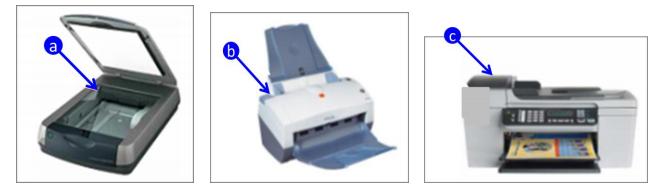
- Types of Scanners
- Flatbed Scanner has a lid that opens to reveal a glass where you place the document you would like to scan.
- Sheet Fed Scanner differs that it has a slot where you can only feed flat documents.
- All in One printer allows you to print, copy, and scan pictures or documents. Many functions operate directly from the control panel.
- Operating Instructions for one type of scanner/scanner software:
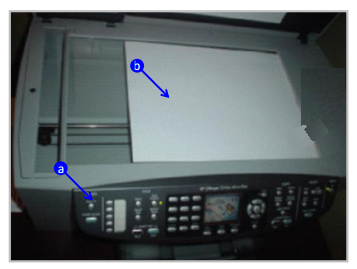
- Turn your personal computer and the connected scanner on.
- Place the document or picture face down on the glass by aligning it straight.
Note: Most scanners provide a ruler guide on the side of the glass.
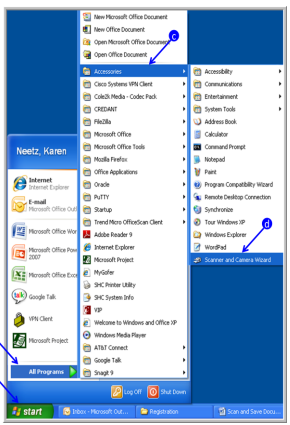
- To open the scanning software on your computer:
- Click on Start.
- Click on All Programs.
- Click on Accessories.
- Click on Scanner and Camera Wizard.
- In most cases, you have the option to scan 2 ways:
Note: Some scanners operate automatically once you have placed the document in.- Select Start Scan from the scanner to scan the document.
- Select Scan from the software in your computer to scan the document.

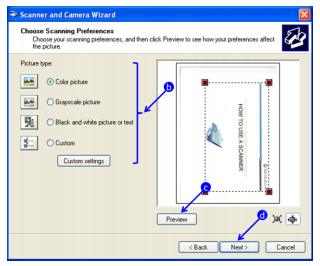
- Preview the document:
- Most scanners allow you to preview the document, before the actual scan occurs.
- In the preview mode, choose your scanning preferences to improve the quality of the document.
- Click on
 button.
 - Validate the scanned documents and if does look the way you want, click on
 button.
 - If document does not look the way you want adjust preferences, location of document on scanner, etc. and complete steps c. and d.
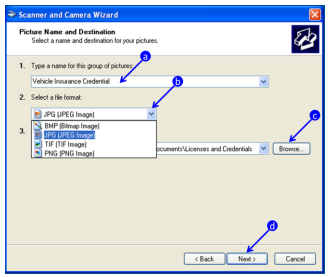
- Name, scan and save your document:
Note: Depending on your scanning software, you might have to save your document prior to completing the scanning process.- Type a name for this group of pictures or document.
- Select a file format by using the drop down arrow.
Note: ServiceLive file formats that are preferred are .jpg, .gif, .pdf, or .doc formats. - Browse for the location to save the document on your computer. Make sure to note where you save the scan so you may locate it later when you need to upload documents into ServiceLive.
- Click on
 button to save document.
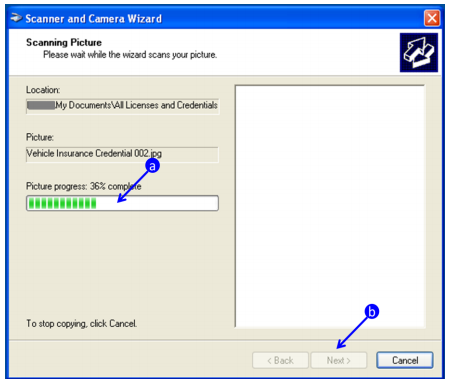
- Complete scanning and saving your document:
- You will notice picture progress as the document completes scan.
- When 100% complete, click on button.
Note: The button will be enabled (available) after scan is 100% complete.
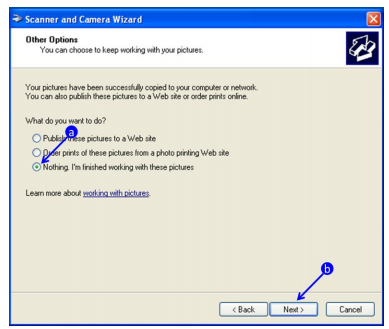
- Other options:
Note: Your scanning software may offer you different options after the scanning is complete.- We recommend you choose radio button labeled “Nothing. I’m finished working with these pictures”.
- Click on button.
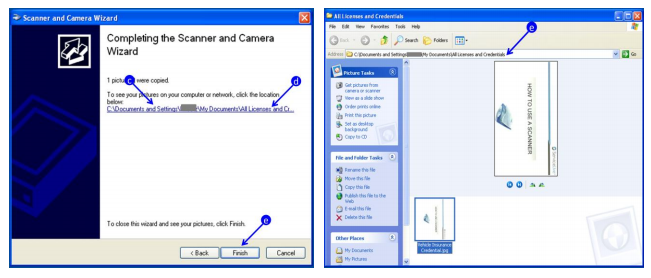
- Locate the document you scanned:
- Document will be available in the location as file type you selected in Step 9 of this lesson.
- After scanning and saving the document, you can view/upload document into ServiceLive using two different methods.
- Identify the location that displays on Scanner and Camera Wizard screen so you can navigate to where the file is located OR
- Click on hyperlink on the Scanner and Camera Wizard screen that will take you directly to where you stored the file.
- Once you clicked on hyperlink, the location of where the scanned file was stored will display in the address bar. The file will also be available to upload into ServiceLive from this screen.
- Click on
 button to close scanning software.
Note: To upload the scanned documents into ServiceLive, refer to Licenses & Certifications lesson in either Provider Firm Profile or Service Pro Profile courses.