This lesson explains how to manage Service Orders in Schedule link. Service Orders in Schedule link have been Accepted and now require schedule confirmation. From Schedule link, Provider Firm can confirm with customer that details of Service Order are correct. (i.e. Right customer, right product, right Service Order Window). You can create Notes as communication to ServiceLive Administrator Team or Buyer, or Request a Service Order Reschedule. Service Orders will stay in the Schedule link until Order is marked “Pre-Call Completed”.
- When you login to ServiceLive, the Dashboard page will open.
- Navigate to
 link:
link:
- Click on
 tab.
tab.

- Click on link from left navigation panel.
- Indicates the number of open Service Orders for your Provider Firm on link.
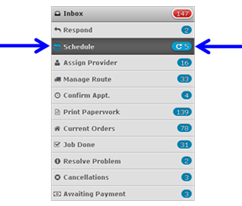
- Click on
- View Service Order Details:
- Click on Title link to display Service Order details on Summary tab.

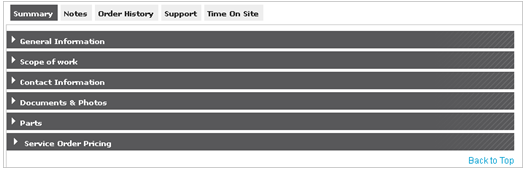
- This will open a Summary tab, which includes sections displayed below. Details about Summary tab are available in Summary Tab lesson in Complete and Close Service Order course.
Note: Click on or
or  buttons to expand or collapse sections.
- Click on Title link to display Service Order details on Summary tab.
- Schedule Service Order:
- Click on
 button.

- Click on
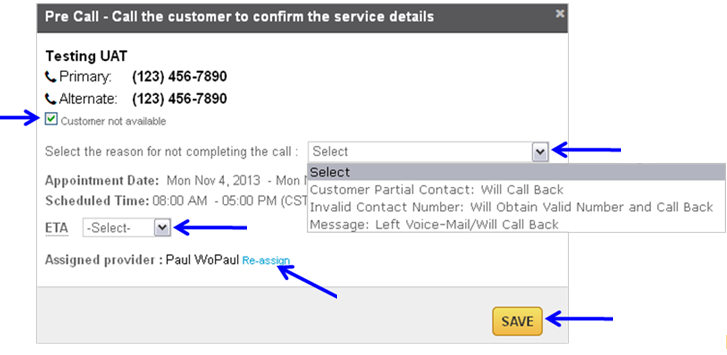
- Pre-Call – Customer not available:
- Select checkbox labeled “Customer not available” to register call attempt.
- Click on the drop down arrow labeled “Select the reason for not completing the call” and scroll to select appropriate choice.
- Click on drop down arrow next to ETA (Estimated Time of Arrival). ETA is optional.
- Click on drop down arrow to display “Assigned Provider” and scroll to select appropriate Provider.
Note: This will only appear if you have not assigned a Provider to Service Order OR if you click on link to assign a different Provider to Service Order.
 - Click
 button when finished.
Pre-Call – Customer not available Confirmation: - Confirmation message for Pre-Call Attempt will display at top of screen.

- Service Order is still located in link with a Schedule Status of Pre-Call Attempted.

- Pre-Call – Customer Available – Confirm the Order Details with Customer:
- Customer name and telephone contact information.
- The
 section header automatically opens to review Service Order Location.
 - Service Order Title and Service Order ID #.
- Service Order Location.
- Click on
 link to view Service Order Location to review any Location notes.
 - Click on
 link to type any additional details to Service Order Location. DO NOT delete existing notes.
Note: Any additional information added to Service Order Location will be added to Providers Copy of Service Order PDF.

- Pre-Call – Customer Available – Confirm the Service with Customer:
- Click on
 section header to review specific Service Order Tasks.
 - Details for Service Order Tasks.
- Click on
 link to display any Special Service Order Instructions given. If no Special Instructions, skip to step e.
 - Click on link to type any changes or additional information to Special Service Order Instructions. DO NOT delete existing Special Instructions.
- Click on
 link to display Product Information and pick up location.
Note: Any additional information added to Service Order Instructions will be added to Providers Copy of Service Order PDF.
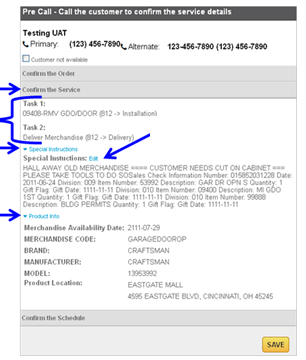
- Click on
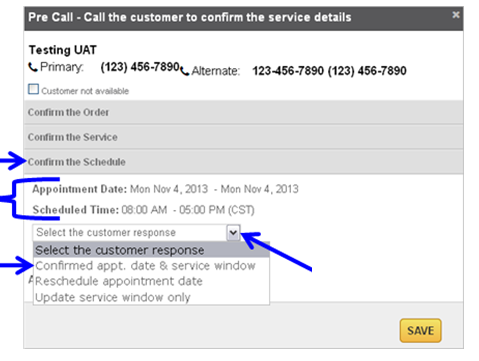
- Pre-Call – Customer Available – Confirm the Schedule:
- Click on
 section header to register Service Window confirmation.
 - Click on drop down arrow labeled “Select the customer response” and select appropriate response.
- Confirmed Appt. Date & Service Window: If you and customer both agree for the current appointment date and time window, select this option.
- Reschedule Appointment Date: If you or customer prefers a different appointment date, select this option.
- Update Service Window Only: To Update Service Window (time of service) only, select this option.
- Scroll down and click on “Confirm appt. date & service window”.
- Click on
- Pre-Call – Success Confirmation:
- Confirmation message for Pre-Call Completed will display at top of screen.
- Service Order is now located in
 link with a Schedule Status of Pre-Call Completed.

- Confirmation message for Pre-Call Completed will display at top of screen.
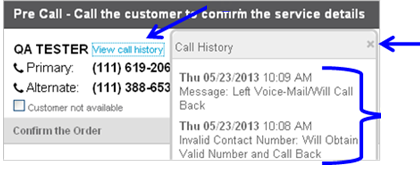
- View Service Order schedule call history:
- Click on button.

- Click on
 link.
link. - Call History will display.
- Click on x in top right corner to close Call History.
- OR click on Service Order Title link from opening Schedule link to view Schedule Status History.

- Hover over magnifying glass in Service Order General Information.
Note: A magnifying glass will not appear if no calls have been made for Service Order.
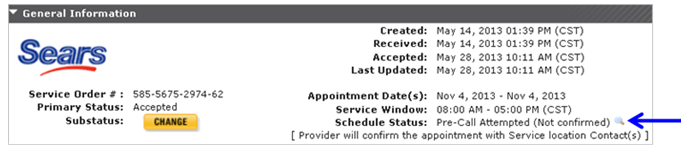
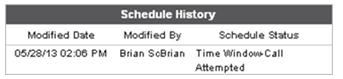
- History of call Schedule History will display.
- Click on